How to Knead Bread Dough: 3 Easy Methods
Some links in this post may be affiliate links. That means I might make a small commission on qualifying purchases if you click the link. There is no extra cost to you.
Learning how to knead dough is easier when you know what to look and feel for. Kneading builds the gluten structure that helps bread trap gas and bake tall, springy, and tender. In this guide, I’ll show you three ways to develop dough strength—by hand, in a stand mixer, and with stretch-and-folds—plus how to tell when your dough is ready.
Quick answer: Knead bread dough by hand (about 8–12 minutes), use a stand mixer (often 5–7 minutes), or use stretch-and-folds during bulk fermentation when your recipe calls for them. To knead by hand, fold the far edge toward you, push the dough away with the heel of your hand, turn it a quarter turn, and repeat. Stop when the dough feels elastic and stretches without tearing right away. Fresh-milled flour can absorb water differently, so allow time for it to hydrate and use the dough’s texture rather than a fixed kneading time.
Why Kneading Dough Matters (The Science)
Kneading hydrates and aligns glutenin and gliadin so they bond into gluten strands. Those strands create an elastic network that traps CO2 from yeast or sourdough, which lifts and opens your crumb. For visuals and technique, see King Arthur’s kneading and windowpane guides (how to knead; windowpane test).

Yeast Dough vs. Sourdough
Commercial-yeast dough develops quickly because you mix, knead, and ferment on a tighter schedule. Sourdough needs strength too, but you can build it through kneading or through timed folds during bulk fermentation. King Arthur explains how folds add strength by stretching and stacking the gluten network (bulk fermentation & folds), and Serious Eats shows knead, fold, and shaping options in detail (sourdough handling).
You can absolutely knead sourdough like a yeast dough and then add a few gentle folds. I prefer kneading because it gives consistent strength, then I use 1–2 fold sets to fine-tune structure.
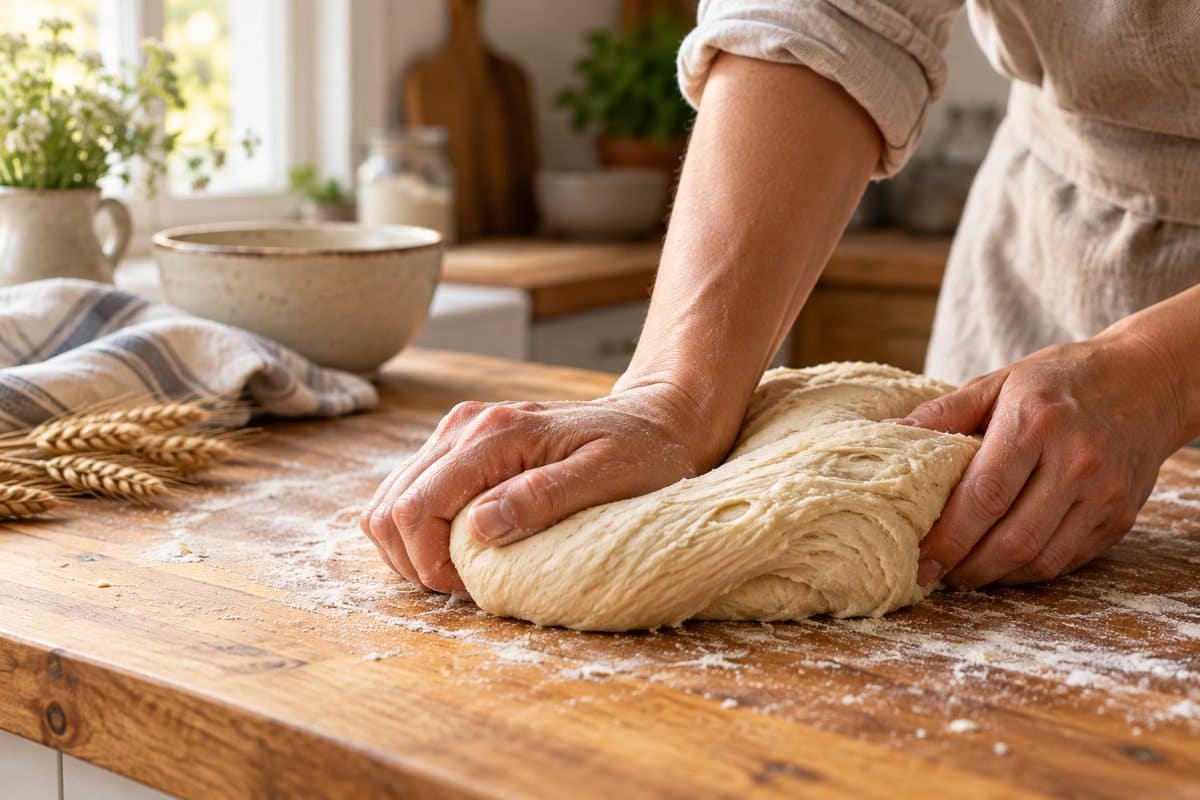
How to Knead Bread Dough by Hand
- Lightly oil the counter, then gather the dough into a ball.
- Press the dough with the heel of your hand and push it straight away from you across the counter.
- Keep the push level and parallel to the counter instead of pressing down.
- Lift the edge farthest from you and fold it over the center toward yourself.
- Turn the dough a quarter turn and repeat the push, fold, and turn until the dough is smooth and elastic.
Aim for 8–12 minutes for most wheat doughs; wet doughs may need a bit more (kneading wet dough).
The goal is to stretch the bottom side of the dough that touches the counter. As you fold, push, and turn the dough, the underside will continue to stretch and develop the strands of gluten.
You will find it very hard to over-knead most doughs by hand because your arms tire before the dough breaks down. If the dough smears and tears instead of stretching, cover it for 10 minutes and resume. Rest periods let starch and proteins hydrate, which makes kneading faster and easier.

How to Knead with a Stand Mixer
Start with the dough hook on low to medium-low speed. For many sandwich breads, 5–7 minutes builds adequate strength; whole-grain doughs often prefer the low end and a short rest to protect dough temperature (KAB whole wheat: 5–7 minutes). As the dough develops, it should pull away from the sides of the bowl, look smoother, and develop a slight sheen.
Overkneading can happen in a mixer, but you will see warning signs: the dough climbs the hook, warms up, tears easily, and looks greasy or ropey. Stop and let the dough rest if you notice those signs.
To practice both mixer kneading and stretch-and-folds, try this sourdough sandwich bread made with fresh milled flour. The recipe explains both methods and compares the finished loaves.
How to Build Dough Strength With Stretch-and-Folds
Stretch-and-folds are a gentle way to develop strength in sourdough and wetter bread doughs. Instead of kneading continuously on the counter, you stretch sections of dough and fold them over the center during bulk fermentation. Use this method when your recipe calls for folds or allows them in place of kneading.
Lightly wet your hand to keep the dough from sticking. Reach underneath one edge of the dough, lift it until you feel resistance, then fold it over the center. Turn the bowl about a quarter turn and repeat. Continue until you have worked around the dough, usually making four folds for one set.
Cover the dough and let it rest for the time specified in your recipe. The rest lets the dough relax before the next set. Many recipes use several sets during the first part of bulk fermentation, but the timing and number of sets vary, so follow the recipe you’re making.
Stretch gently; don’t pull so hard that the dough tears. As the dough rests and folds, it should become smoother and hold its shape better. This method is especially helpful when a wet dough is difficult to handle with traditional kneading.
Kneading Fresh-Milled Flour: Hydration, Timing & Lecithin
Fresh-milled dough doesn’t have one set kneading time. The time varies with the recipe, batch size, and mixer. Start with your recipe’s timing, then check the dough: it should look smoother and feel elastic, with a slight sheen. If it still tears quickly, let it rest briefly before mixing longer. The windowpane test can help you judge its development.
Some fresh-milled bread recipes include lecithin as an optional ingredient. The amount varies by recipe, so follow the formula you’re using rather than applying one percentage to every dough. Lecithin is not required for kneading; use the texture cues above to judge when your dough is ready.
When you’re ready to put these techniques into practice, explore my fresh milled flour recipes for beginner-friendly breads, muffins, bagels, and desserts.
The Windowpane Test & Visual Cues
Pinch off a walnut-size piece of dough and gently stretch it. If you can pull it thin enough to let light through without tearing, you pass the windowpane test (what is windowpane; visual guide). Not there yet? Knead two more minutes, rest five, and test again.
If the test feels tricky, watch the dough. Properly kneaded dough looks smoother with a slight glossy sheen and springs back when you poke it. Under-kneaded dough feels rough and tears; over-mixed machine dough looks stringy and warms up fast.
Once your dough is kneaded, the next step is letting it rise. Learn how to tell when bread dough has risen enough by looking for visual clues and using the simple poke test.
Troubleshooting & Quick Tips
If dough tears during shaping, you likely need more strength—knead a bit longer or add a fold in bulk. If dough feels tight and resists shaping, let it rest to relax the gluten. For sourdough, combine a short initial knead with 2–3 sets of stretch-and-fold to build strength without overheating (why folds work; folding methods). When you switch to home-milled grain, revisit hydration and knead time using our guide: Fresh Milled Flour.
Common Dough Problems While Kneading
Dough can feel sticky, tight, or rough at different points in the kneading process. Give the flour time to absorb the liquid and the gluten time to develop before making a big adjustment. A dough that feels messy at first may become smoother after a short rest and a few more kneading motions.
If the dough is sticky, resist adding a large amount of flour right away. A slightly tacky feel is normal, and too much extra flour can make the baked bread dry or dense. Scrape sticky dough from the counter or bowl, cover it, and let it rest for about 10 minutes before continuing. For very wet dough, use a dough scraper or lightly damp hands and follow the handling method in your recipe.
If the dough feels dry or crumbly, it may need more liquid or more time to hydrate. Check the recipe first, especially if you measured flour by volume. If the dough remains dry after resting, work in water a teaspoon at a time until it holds together. Fresh-milled flour can absorb liquid differently depending on the grain and how finely it was milled, so make small adjustments and give it time to rest.
If the dough keeps snapping back, cover it and let it rest for 10 to 15 minutes. The gluten may be tight from kneading, and resting lets it relax so the dough is easier to work with. After the rest, continue gently instead of pushing harder.
If the dough tears instead of stretching, knead for another minute or two, then pause and test again. If it still tears quickly, cover it for five to 10 minutes and let the dough rest before resuming. A windowpane test can help, but use your recipe and the dough’s overall texture as your guide.
When using a stand mixer, watch the dough rather than relying only on the timer. Stop periodically to check whether it is becoming smoother and more elastic. If it grows warm, climbs the hook, or starts tearing, stop the mixer and let the dough rest before deciding whether it needs more kneading.
Summary: Kneading builds gluten strength so dough can trap gas and rise. Knead by hand or use a stand mixer, or build strength with stretch-and-folds when your recipe calls for them. Look for smooth, elastic dough. With fresh-milled flour, allow time to hydrate and use the dough’s texture rather than a fixed kneading time. Lecithin is optional.
Kneading Dough FAQs
How long should I knead dough by hand?
Most wheat bread dough takes about 8–12 minutes to knead by hand. Wet dough may need more time or a short rest. The dough is ready when it looks smoother, feels elastic, and stretches without tearing right away.
How long should I knead bread dough in a stand mixer?
Many bread doughs take about 5–7 minutes in a stand mixer, but the time varies with the recipe, batch size, grain, and mixer. Fresh-milled dough doesn’t have one universal kneading time. Follow your recipe’s guidance and check that the dough looks smoother and feels elastic, with a slight sheen. The windowpane test can help you judge its development.
How can I tell when dough is kneaded enough?
Well-kneaded dough looks smoother and feels elastic and slightly tacky. It should stretch without tearing immediately and may develop a light sheen. You can also check it with the windowpane test.
What is the windowpane test for dough?
Pinch off a small piece of dough and gently stretch it between your fingers. If it stretches thin enough to let light through without tearing, the gluten is well developed. If it tears quickly, knead for a little longer, let the dough rest, and test again.
Can you overknead dough?
It is very difficult to overknead most dough by hand, but a stand mixer can overwork dough. Watch for dough that gets warm, climbs the dough hook, tears easily, or looks greasy or ropey. Stop mixing if you see these signs.
Should you knead sourdough or use stretch-and-folds?
You can build strength in sourdough by kneading, using stretch-and-folds, or combining both methods. Follow the method in your recipe. Stretch-and-folds are useful during bulk fermentation, while kneading develops strength earlier in the process.
How do you knead sticky dough without adding too much flour?
A slightly tacky dough is normal. Lightly oil your hands or work surface, or cover the dough and let it rest for about 10 minutes before continuing. Add more flour only if the dough remains too difficult to handle; too much can make bread dry or dense.
Does fresh-milled flour need more kneading?
Fresh-milled flour doesn’t automatically need a longer knead. Its water absorption can vary with the grain and how finely it was milled. Follow your recipe, allow time for the flour to hydrate, and judge the dough by its texture: it should become smoother and elastic. A short rest can help if it feels tight or tears easily.
About the Author (and Baker)

Kim is an adventurous mama of 5 who has been building new skills over 16 years of marriage. Over the past decade, she and her family have built a homestead from the ground up, starting with meat and egg chickens, growing into a large garden, and learning to preserve their harvest.
She taught herself to sew, crochet, and knit 13 years ago through books and early YouTube tutorials, and has been making handmade projects ever since.
Cooking from scratch became a necessity and a passion as her family learned to eat more nutritionally and live more frugally. She tests all of her sourdough and fresh milled flour recipes on the kids to ensure they’re delicious and nutritious.
At Plain Living, Kim shares what she’s actually lived — not theory, but the real skills she’s picked up through years of trial, error, and love for her family and home.
