How to Make Amazing Cinnamon Rolls with Fresh Milled Flour
Some links in this post may be affiliate links. That means I might make a small commission on qualifying purchases if you click the link. There is no extra cost to you.
Cinnamon Rolls made with fresh milled flour are the ultimate guilt-free treat. Okay, not totally guilt-free, but definitely more nutrient dense than other options. Fresh milled spelt or wheat make soft, fluffy, delicious cinnamon rolls that really pack a punch with more protein, lots of vitamins, and several grain options. If you’re trying to make the switch to milling your own flour, this recipe is a great place to start.
You are going to love these
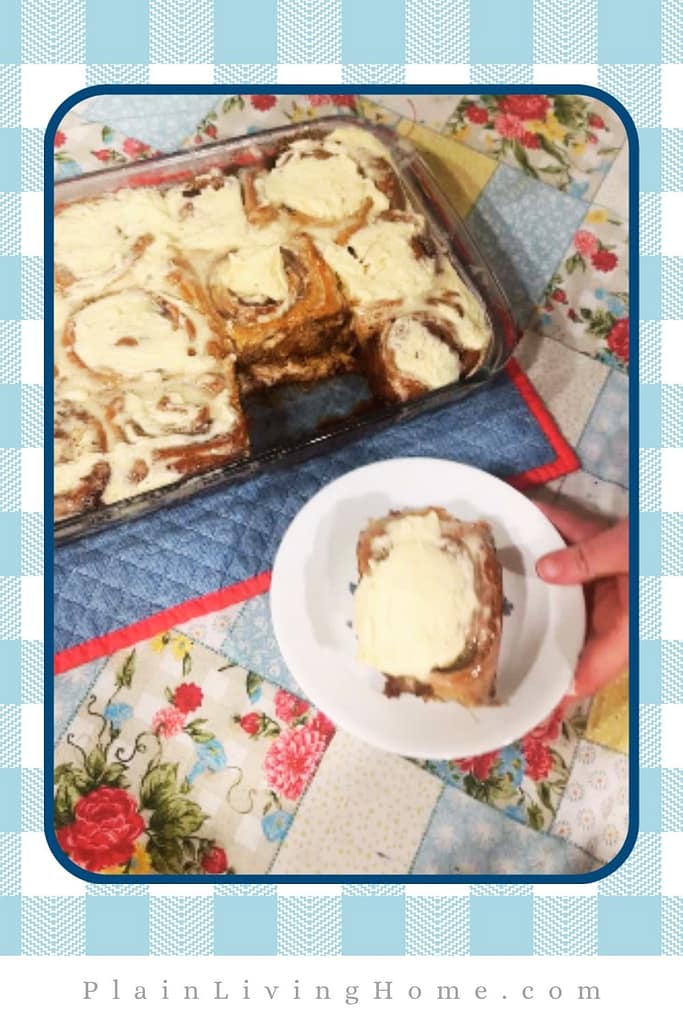
Cinnamon Rolls with Buttercream Icing
Table of contents
- Cinnamon Rolls with Buttercream Icing
- Why You’ll Love These Cinnamon Rolls
- Ingredients You’ll Need
- Other ingredients
- Equipment Needed
- How to Make Cinnamon Rolls with Fresh Milled Flour(Step-by-Step)
- How to Store Cinnamon Rolls
- How Fresh Milled Flour Affects Cinnamon Rolls
- Printable Recipe Card
- Leave a Comment and Share Your Results
Why You’ll Love These Cinnamon Rolls
When I first started using fresh milled flour, I thought everything would be gritty and we would just have to get used to it in the name of nutrition. I even said “who wants a biscuits made with whole wheat? Nobody.” But once I actually started using fresh milled wheat, spelt, and rye, I realized the end product is incredible.

Baked good make with fresh milled flour turn out fluffy and flavorful. There’s no gritty texture. Cinnamon rolls are no different. The fresh milled flour makes a beautiful, soft, fluffy dough that makes the perfect vessel for the cinnamon sugar filling and the buttercream icing.
My kids devour these. They don’t even notice that they’re made with fresh milled flour.
A Brief History of Flour
Before the Industrial Revolution, each village or town had a mill. Members of the community could get enough grains milled for just a few days or a week at a time. That’s about what each household could store. The local mill allowed an entire area to grind their grains into flour and meal without individuals making a major investment.
The industrial revolution changed that with the advent of a steam powered mill. With the industrial age beginning, people left rural farm areas and moved into cities. Instead of each household going to the mill for a weeks worth of flour, the mills began mass producing flours and meals. Mass production meant two things. First, there was more flour available than what was needed locally. Second, the large mills put the small ones out of work, meaning areas further from the mills needed their flour to be stored and transported.
Flour needed to last 6 months to a year to survive this process. Unfortunately, flour goes rancid and loses its nutrients completely within 6 months. By the 1930s, the government intervened and required flour to be enriched. The enrichment process added back in a handful of nutrients after the flour was milled and processed. Typically 5 nutrients are added to enriched flour- compared to over 40 in most whole grains.
Why Fresh Milled Flour Is Better Than Store Bought
The first and obvious reason is the nutrition. Dead, empty flour could never compete with a whoel grain full of vitamins and minerals.
Secondly, whole grains are affordable. When you buy in bulk, you can save a significant amount of money. With inflation soaring and grocery prices rising, every little bit helps.
And finally, the bulk options make it easy to stock up. Whole grains store well and last for a very long time.
Ingredients You’ll Need
Fresh Milled Flour
Fresh milled flour is sort of a vague term that encompasses a lot of different ingredients. Technically, fresh milled flour could be make from spelt, rye, wheat, rice, barley, einkorn, kamut and more! I only have experience with both soft and hard, red and white wheats, spelt, and rye. This recipe works great with any wheat flour and with spelt! Just mill your grains as you measure the rest of your ingredients for the best results.
Yeast
There are 2 basic kinds of yeast that you will find available in the store. The first is intent yeast and it works quickly. The granules are smaller. This type of yeast can be mixed in with dry ingredients. It work great in bread machines.
The second type of yeast is active dry yeast. It has larger granules and needs to be activated by soaking in warm water. It has a bit more rising power and works better in recipes that require a longer rise time.
Either type of yeast will work in this recipe- just remember that if you choose active dry yeast, you’ll need to let it bloom in the warm water first.
Sunflower Lecithin
I learned about sunflower lecithin from the bread Beckers, who provide a wealth of information about healthy grains. Lecithin is a great additive to your fresh milled flour breads because it strengthens the dough. Fresh milled flour naturally has less gluten, which develops slower than all purpose fortified flours.
Even though the lecithin serves a practical purpose, it also has nutritional benefits. Sunflower lecithin is known to provide digestive support, cholesterol lowering compound, great milk production, heart and brain support, and more!
High Quality Salt
I started trying different salts over a decade ago. Our first “new” salt was pink Himalayan sea salt. It’s pretty widely available in grocery stores. It’s better than processed, iodized table salt.
Then we tried Celtic Sea salt. It’s delicious and comes in several different sizes.
But then I learned about Remond Real Salt from Homesteading Family, a YouTube channel that teaches all about growing a homestead and eating well. It is full of nutrients, and still pretty affordable. I like that it’s available in bulk, and it’s also great for livestock.
Bumble Bee Apothecary, a YouTube channel and website about healthy living recommended Baja Gold Salt. It is truly a different experience to use this salt. The flavor profile is much broader. however, it is more expensive.
I like to keep an assortment of healthy salt options around for healthy eating. Use whichever salt you have on hand or prefer, but definitely consider some of these other options over cheap able salt.
Butter
I don’t believe in unsalted butter. But that’s for another day. Cinnamon rolls use butter for both the dough and the cinnamon sugar filling. If you decide to make a buttercream icing, you’ll need even more butter. All that butter makes these cinnamon rolls particularly decadent.
Cinnamon
Cinnamon is the star of the show here. It gives the perfect spicy balance to the brown sugar to make the delicious filling. Cinnamon is actually more than one plant- it can be obtained from the inner bark of several different types of trees. There are some people out there whom I would call cinnamon snobs. There’s no need to be a cinnamon snob for this recipe. Any ground cinnamon will work.
Other ingredients
You will also need the following ingredients for your cinnamon roll dough, filling, and icing:
- milk
- egs
- brown sugar
- vanilla
- heavy cream
Equipment Needed
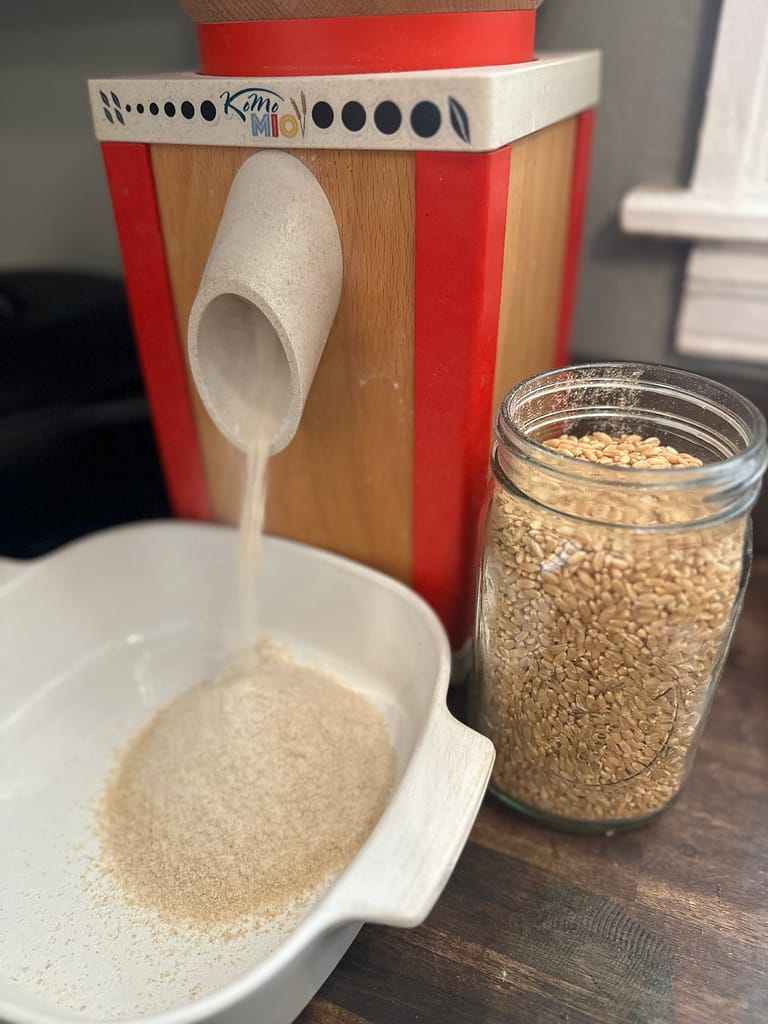
Grain mill
This recipe calls for fresh milled flour. Granted, you might have access to fresh milled flour through a friend or a local farmer’s market. But most likely, you will need to mill the flour yourself. There are rave reviews all over the internet about the Nutrimill and the MockMill. I just bought the cheapest option available on amazon at the time I had the money saved.
My grain mill is some odd off brand that’s no longer available. I have had it for 5 years now and it’s still going strong. Even though I can’t give you an exact link to it, I just want to encourage you that it’s okay to not buy the big name brand mill that you see all the YouTube and bloggers using.
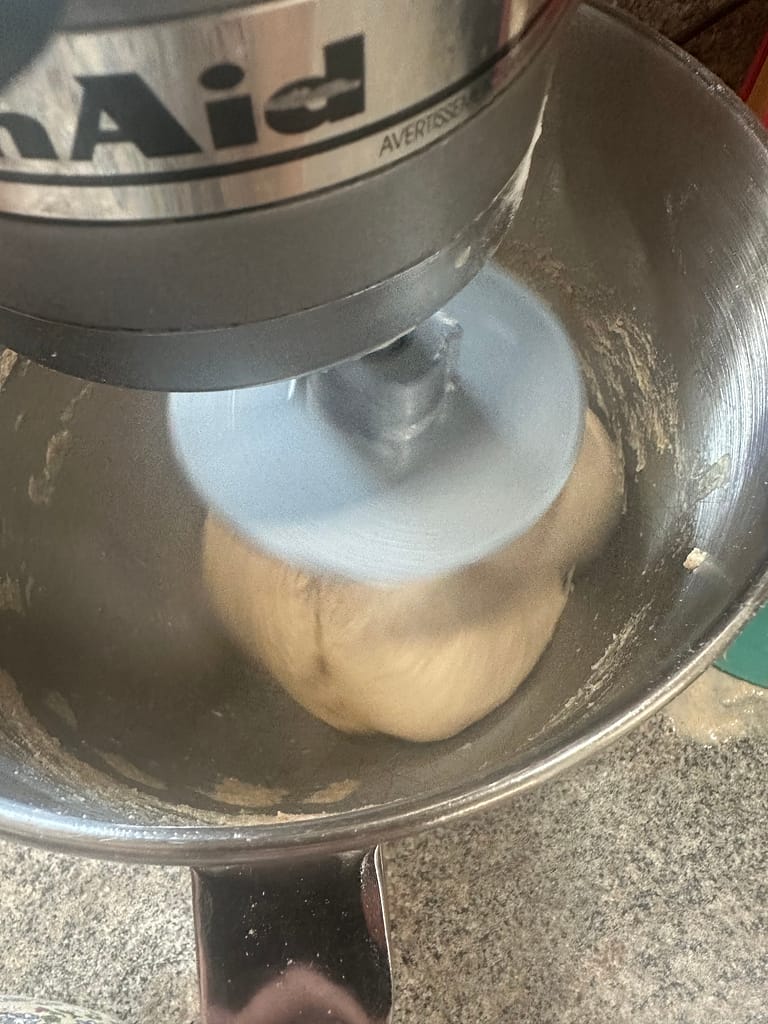
Stand Mixer
I prefer to make this recipe with my stand mixer. It makes both the dough and the icing so much easier to make. However, you can do the entire recipe by hand if needed. You’ll have the knead the dough and whisk the buttercream.
How to Make Cinnamon Rolls with Fresh Milled Flour(Step-by-Step)
1: First, Mill the Flour and Measure the Ingredients
Since you’ll need 4.5 cups of fresh milled flour, you should expect to put about 3 to 3.5 cups of grain into the mill. Put the grain in the hopper and turn the mill on. Meanwhile, you can measure the remaining ingredients so they’re ready to mix.
2: Next, combine ingredients
Warm your milk (or water) slightly and add to the mixed bowl. If you chose active dry yeast, add it and allow it to bloom for 10-15 minutes. Add 6 tablespoons of melted butter, honey, and eggs to the milk and yeast mixture. Then, add the fresh milled flour. Mix until all of the flour is wet.
Step 3: Let the flour rest
Fresh milled flour naturally takes longer to absorb liquid. Once it is all coated well, allow it to rest for 10 minutes or so. If you skip this step, it will take a very long time for your dough to reach the correct stage.
Step 4: Knead
Doughs made with fresh milled flour take much longer to knead. You can still aim for dough that is glossy and passes the window pane test, just like most doughs. However, fresh milled flour will take much longer to develop gluten than all purpose flour. I typically turn my mixer on 3-4 with the dough hook installed, then set a timer for 15 minutes and walk away.
5: Bulk Rise
This step consists of more waiting. Cover the dough with a tea towels or a bowl cover and allow it to rise for 45 to 60 minutes. It should double in size.
Step 6: Roll and Roll again
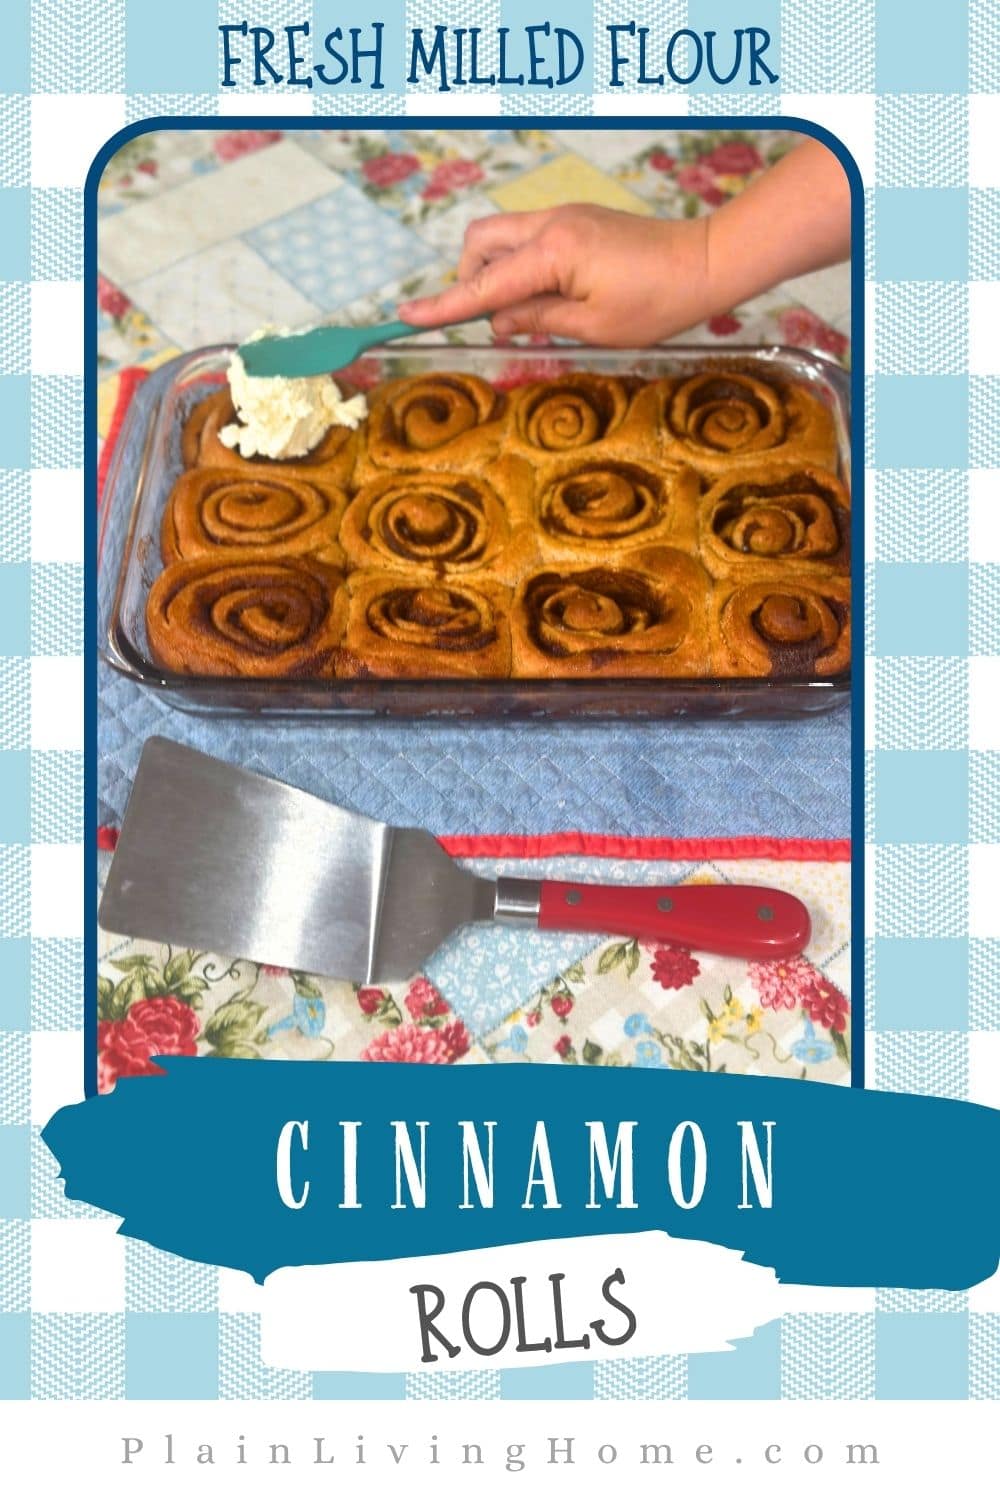
This step is the fun part! On a floured counter, roll the dough out into a rectangle about 1/4″ thick. Mix together 12 Tbs softened butter, 1.5 Cups brown sugar, and 3 Tbs cinnamon. Spread this mixture all over the dough rectangle. With a knife or pizza cutter, cut the dough into 1″ strips. Then roll each strip into a tight spiral to create the cinnamon rolls. Place the rolls into a buttered 9×13 dish.
7: Second Rise
Now there’s more waiting. This recipe feels like waiting and not much else, but it’s so worth it. Plus, all the down time in between steps gives you time to get other stuff done around the kitchen! Allow your cinnamon rolls to rise for another hour while covered with a damp tea towel. When they’re light and fluffy, bake at 375 degrees for about 30 minutes. Remove from the oven and allow to mostly cool so the icing doesn’t melt.
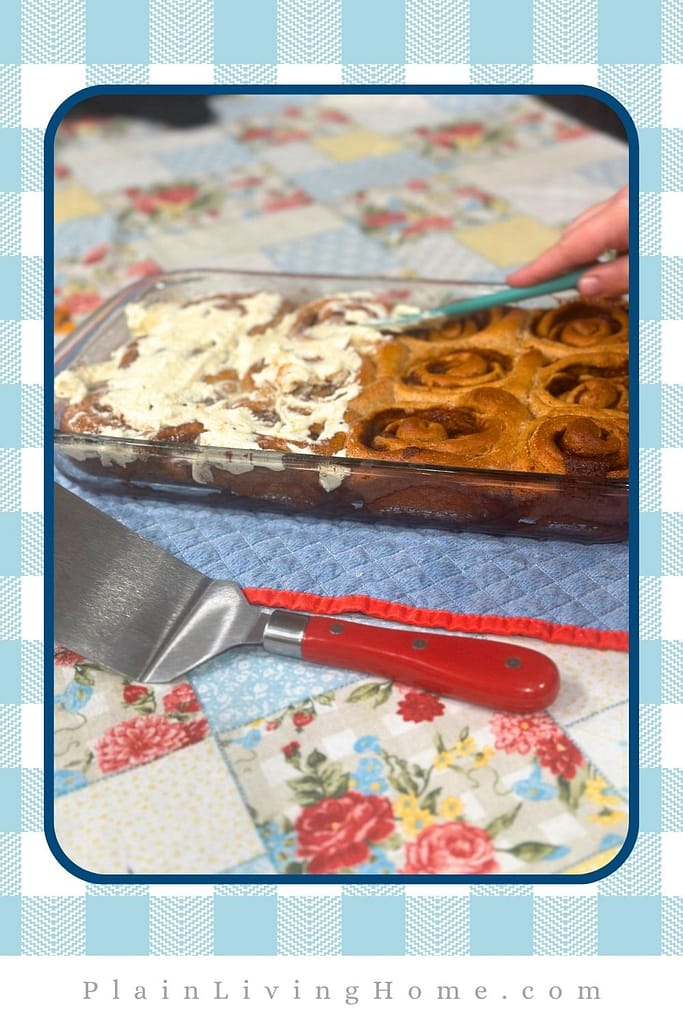
Step 8: Icing
While the cinnamon rolls cool, prepare the buttercream icing. First, whip your softened butter for 5-10 minutes. Trust me, this step is necessary. It will make your icing velvety smooth.
Then, sift your powdered sugar in and continue to whip until the sugar is fully incorporated into the butter. Next, add vanilla and heavy cream until the icing is the consistency you desire. I prefer my icing to be a bit thick because I want to put it on warm rolls and it tends to melt. Finally, spread the icing or pipe it beautifully on top of your cinnamon rolls. now, serve with a big glass of cold milk.

Tips to help when you’re making Fresh Milled Flour Cinnamon Rolls
- Don’t skip on kneading the dough. The better you develop the gluten, the softer your rolls will be.
- Use all of the filling. If you feel brave, sprinkle a bit of salt over the filling too.
- If you don’t want buttercream, make a simple icing with milk and powdered sugar.
How to Store Cinnamon Rolls
Fresh milled cinnamon rolls are soft, fluffy, and best eaten fresh. Because they don’t have preservatives, they don’t last as long as store-bought rolls.
The key is to keep them covered tightly so they don’t dry out. Air is your biggest enemy here.
Refrigerator Storage
You can store cinnamon rolls in the fridge, but it’s not always the best option. Cold temperatures can dry out baked goods and make them feel firm instead of soft.
If your rolls have the buttercream frosting, the fridge is tan okay choice but will dry out the icing and dough.. Store them in an airtight container and they will last about 5–7 days.
Before serving, warm them slightly to bring back that soft, fresh texture.
Freezer Storage
Freezing is the best way to keep cinnamon rolls fresh long-term.
Let the rolls cool completely, then place them in a freezer-safe bag or container. They can last up to 3–4 months in the freezer.
To use, let them thaw at room temperature for about 30–60 minutes. Then warm gently in the oven or microwave.
For best results, frost them after thawing.
Shelf Life
Here’s a quick breakdown:
- Room temperature: 1–3 days (covered tightly)
- Refrigerator: up to 1 week (if frosted)
- Freezer: 3–4 months
Fresh milled flour recipes tend to dry out faster, so plan to enjoy them sooner rather than later.
How to Serve Cinnamon Rolls
Cinnamon rolls are best served warm. That’s when they are soft, gooey, and full of flavor.
If they’ve cooled, just heat them for 10–20 seconds in the microwave or a few minutes in the oven. This brings back that fresh-baked feel.
Add extra frosting on top right before serving for a bakery-style touch.
Meal Ideas
Cinnamon rolls can be more than just a treat. They can be part of a full, cozy meal. In the mid west, it’s common to serve cinnamon roll with a bowl of chili. To us southerners, it seems insane, but adapting to midwestern culture is all part of Plain Living!
If you’re not into the midwestern combo, try serving them with:
- Scrambled eggs and bacon
- Fresh fruit and yogurt
- A simple breakfast casserole
This balances the sweetness and makes it feel like a complete meal.
Pairing Suggestions
Pair your cinnamon rolls with drinks that complement their rich flavor.
Some great options include:
- Fresh brewed coffee
- Hot chocolate
- Milk (especially for kids)
- Spiced chai or herbal tea
The warm spices in the rolls pair especially well with cozy drinks. My blogger friend Sylvia at TheProverbsKitchen.com has some incredible drink recipes that would go great!
Creative Ways to Use Leftovers
Don’t let leftover cinnamon rolls go to waste. There are so many fun ways to use them.
Try these ideas:
- Turn them into a cinnamon roll French toast bake
- Slice and toast them with butter
- Use them as a base for a dessert trifle
- Make a simple bread pudding
These ideas actually make leftovers feel like a brand new recipe.
Make-Ahead and Batch Cooking Tips
Cinnamon rolls are perfect for planning ahead.
You can prepare the rolls, then refrigerate them before the final rise and bake the next day. This helps you have fresh rolls in the morning without all the work.
You can also freeze baked or unbaked rolls for future meals. This is a great way to always have something special ready.
Doubling the Recipe
Cinnamon rolls are easy to double, and it’s usually worth it.
Make one batch for now and one for the freezer. Since the process takes time, doubling saves effort later.
Just be sure to use a large enough bowl and allow extra space for the dough to rise.
Meal Prep Ideas
Cinnamon rolls can fit into a simple meal prep routine.
Here are a few easy ways to plan ahead:
- Bake a batch and freeze individual portions
- Prep rolls the night before for a quick morning bake
- Portion leftovers for grab-and-go breakfasts
This is especially helpful for busy families or weekend hosting.
How Fresh Milled Flour Affects Cinnamon Rolls
Fresh milled flour changes both the texture and flavor of cinnamon rolls in a good way. It makes them more filling, more flavorful, and more wholesome.
Texture
Cinnamon rolls made with fresh milled flour are usually a little more dense than white flour rolls. They still turn out soft and fluffy, but they have a bit more “bite” to them.
This happens because fresh milled flour includes the whole grain—the bran and germ—which adds structure. It also absorbs more liquid, so the dough may feel slightly thicker or heavier.
The key is to knead well and give the dough enough time to rise. When you do that, you still get soft, pillowy rolls.
Flavor
The flavor is where fresh milled flour really shines.
Instead of a plain, sweet dough, you get a rich, slightly nutty taste. It pairs perfectly with cinnamon and brown sugar, giving your rolls a deeper, more homemade flavor.
Many people say once they try fresh milled cinnamon rolls, regular ones taste bland.
Color
Fresh milled flour also gives your rolls a more golden or slightly brown color.
This is completely normal and actually a sign that you’re using the whole grain. It makes the rolls look rustic and homemade.
Tips for Best Results
- Use warm liquid to help the dough rise well
- Don’t skip the kneading step
- Let the dough fully double in size
- Add a little extra moisture if the dough feels dry
These small adjustments make a big difference.
Not always. Fresh milled flour absorbs more liquid than all-purpose flour.
You may need to add a little extra milk or water to get the right dough consistency. Start with your recipe, then adjust as needed. Or, for ease, jsut use the Plain Living Fresh Milled Cinnamon Rolls Recipe.
Dense rolls are usually caused by not enough rising time or not enough kneading.
Fresh milled dough needs a little more time to develop gluten and rise properly. Make sure the dough doubles in size before baking.
Yes, sometimes they do.
Because of the bran in the flour, the dough can rise a bit slower. Keeping the dough in a warm spot helps speed things up.
You can use 100% fresh milled wheat, and many people do. My favorite flour is spelt, but the best is to mix soft wheat and spelt.
If you want a lighter texture, you can mix in a little bread flour. But it’s not required if you’re okay with a slightly heartier roll.
Soft white wheat is a popular choice because it makes a softer texture.
Hard white wheat works too, but it will give you a slightly more chewy and hearty roll.
Yes, and in a good way.
They have a richer, deeper flavor with a slightly nutty taste. This makes them feel more homemade and less processed.
Quick Summary of the Recipe
Mix and knead your dough. Allow it to double in size. Punch it down, roll it out, and spread the filling. Then rolls it into tight spirals. Bake at 375 for 30 minutes. While the rolls cool, make the icing, then spread it on the cinnamon rolls. Serve warm with a glass of cold milk.
Printable Recipe Card
Cinnamon Rolls with Fresh Milled Flour
Equipment
- 1 whisk
- 1 rubber spatula optional: use a piping bag
Ingredients
Dough
- 1.5 Cups milk warmed
- 4 tsp yeast active dry, or instant
- 6 Tbs butter softened
- 2 eggs
- 1/4 cup honey
- 4.5 cups fresh milled flour wheat or spelt
Filling
- 12 Tbs butter softened
- 1.5 cups brown sugar
- 3 tbs cinnamon
Buttercream Icing
- 1 stick butter
- 4 cups powdered sugar sift well
- 1/4 cup heavy cream
- 2 tsp vanilla
- pinch salt
Instructions
1: First, Mill the Flour and Measure the Ingredients
- Since you’ll need 4.5 cups of fresh milled flour, you should expect to put about 3 to 3.5 cups of grain into the mill. Put the grain in the hopper and turn the mill on. Meanwhile, you can measure the remaining ingredients so they’re ready to mix.
2: Next, combine ingredients
- Warm your milk (or water) slightly and add to the mixed bowl. If you chose active dry yeast, add it and allow it to bloom for 10-15 minutes. Add 6 tablespoons of melted butter, honey, and eggs to the milk and yeast mixture. Then, add the fresh milled flour. Mix until all of the flour is wet.
Step 3: Let the flour rest
- Fresh milled flour naturally takes longer to absorb liquid. Once it is all coated well, allow it to rest for 10 minutes or so. If you skip this step, it will take a very long time for your dough to reach the correct stage.
Step 4: Knead
- Doughs made with fresh milled flour take much longer to knead. You can still aim for dough that is glossy and passes the window pane test, just like most doughs. However, fresh milled flour will take much longer to develop gluten than all purpose flour. I typically turn my mixer on 3-4 with the dough hook installed, then set a timer for 15 minutes and walk away.
5: Bulk Rise
- This step consists of more waiting. Cover the dough with a tea towels or a bowl cover and allow it to rise for 45 to 60 minutes. It should double in size.
Step 6: Roll and Roll again
- This step is the fun part! On a floured counter, roll the dough out into a rectangle about 1/4″ thick. Mix together 12 Tbs softened butter, 1.5 Cups brown sugar, and 3 Tbs cinnamon. Spread this mixture all over the dough rectangle. With a knife or pizza cutter, cut the dough into 1″ strips. Then roll each strip into a tight spiral to create the cinnamon rolls. Place the rolls into a buttered 9×13 dish.
7: Second Rise
- Now there’s more waiting. This recipe feels like waiting and not much else, but it’s so worth it. Plus, all the down time in between steps gives you time to get other stuff done around the kitchen! Allow your cinnamon rolls to rise for another hour while covered with a damp tea towel. When they’re light and fluffy, bake at 375 degrees for about 30 minutes. Remove from the oven and allow to mostly cool so the icing doesn’t melt.
Step 8: Icing
- While the cinnamon rolls cool, prepare the buttercream icing. First, whip your softened butter for 5-10 minutes. Trust me, this step is necessary. It will make your icing velvety smooth.
- Then, sift your powdered sugar in and continue to whip until the sugar is fully incorporated into the butter. Next, add vanilla and heavy cream until the icing is the consistency you desire. I prefer my icing to be a bit thick because I want to put it on warm rolls and it tends to melt. Finally, spread the icing or pipe it beautifully on top of your cinnamon rolls. now, serve with a big glass of cold milk.